Thursday, March 31, 2011

Back at the Miata


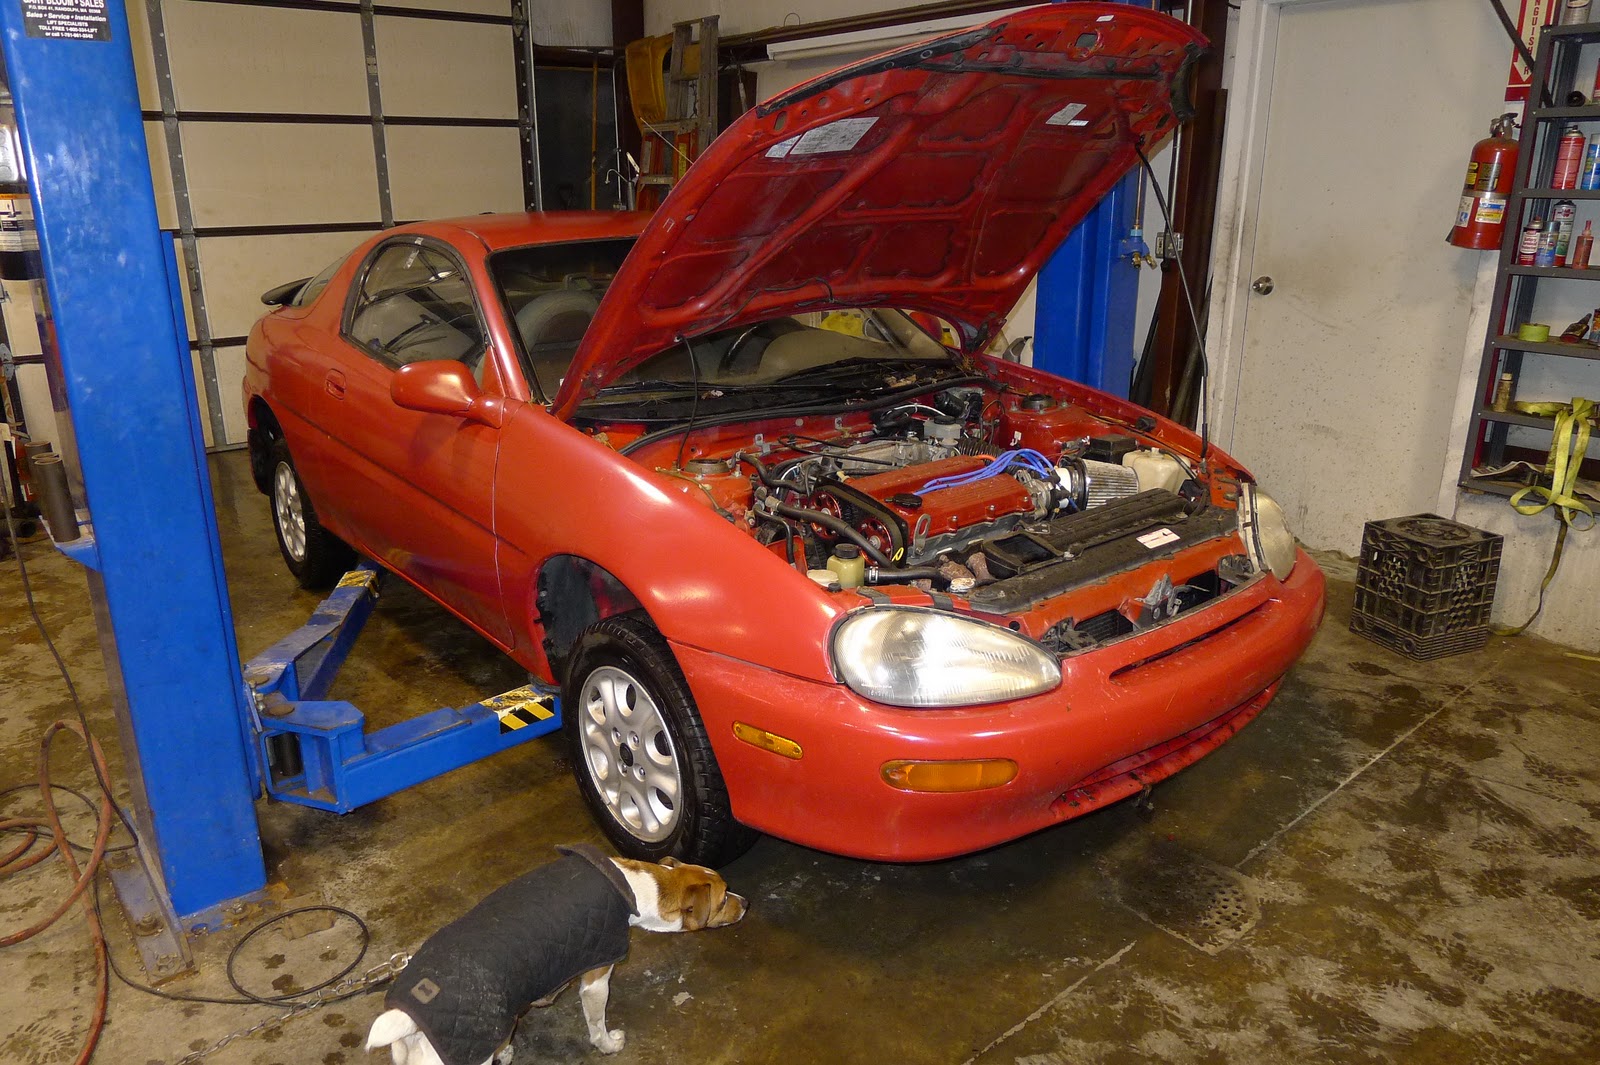
Here's a few more pictures of the project and how its shaping up. We used the old 1.6 alternator bracket and modified it to give clearance for the 1.8 manifold. This will also make it easier to add independent throttle bodies at a later time.

Also need to add block off plates onto the manifold to cover holes not used.

The miata are prone to overheating number four cylinder do to poor cooling flow so we'll be doing mods to the cooling system as well.
couple more pictures, injectors installed and fuel line route through the manifold

Thursday, March 24, 2011

1963 R69S BMW pictures

Here are a few pictures of my 1963 R69S BMW. When I purchased it the engine hadn't been run since 1974. The first thing I did was drain the fluids as a matter of course. Finding bearing cage in the transmission fluid stopped me in my tracks from firing it up. What good is getting it running if you can't ride it? It would be 8 or so years before I'd get back to working on it. So to do a proper job of it I stripped the engine down first to clean the slingers and give a good overall inspection. I few interesting things came from the engine strip. Being an early 69S many of the engine components were stamped or etched with numbers and such. The crankshaft was etched in several places and the flywheel was stamped 'R69' The previous owner had told me that it would need to have the heads re-done as it had a Triumph valve installed at one point. No need to play games, the heads were sent off to Randy Long in Pa for a complete overhaul. The pistons though are a an interesting thing, the tops and bottom of the skirts were knurled. having done a quite a few pre-70's boxer engines in the past fifteen years, this came as a new surprise to me! not having a good set on hand they went back in as its easy enough to swap in a new set in the future. Reassembly was per usual, uneventful. One note to those that are doing their own boxer engine; get the steel crankshaft timing gear good and hot! Get it really hot so you need to use thick gloves to install it. I decent paint stripping gun can get it to that heat. In any case, when its good and hot it drops right on with a click. This also applies to all BMW boxer engines. The rest of the drive train was gone through; new seals for the final drive so as to use GL-4 gear lube. early seals were only design for 40 SAE engine oil, and with age they really aren't up to the task anymore. In this case, the seals were leaking and had ruined the brake shoes. Lucky me was able to find a NOS set on the shelf at Duncan's shop [Duncan's Beemers; Maynard, Mass. 1-978-897-2697] Rebuilding the transmission was basic as usual; replace all the bearings and seals giving special attention to the adjustment of the shifting forks and shimming.

Wednesday, March 23, 2011

Oil pan swap- the Miata budget racer

We started with a MX3 running a built Protege engine and nothing better to do. After a few weeks into the fall the 1993 Project Miata appeared as the perfect candidate. But as the MX3 is a transverse engine the Miata is not. No matter how many different modifications that can be chosen the oil pan has to be changed.
Its a straight forward change, we used a 2001 miata oil pan which kept us away from making too many modifications. only few points to keep in mind ; the dip stick, the sump and the backing plate on the engine. The dip stick needs to be changed from its forward Protege (front of engine) position to the rear drivers side (Miata ) position. I cut down the old tube and gave it a good welding before reinstalling it.
the engine backing plate between the transmission and engine needs to be change to the miata type. You can use the Protege plate but I wouldn't recommend as you'd have to drill the alignment holes. the two different transmissions use different bolt patterns. I reused the 1.6 plate; this also gives the original the mounting point for the miata dip stick tube.


An engine stand is great for this chore, beats dancing with your lady. Once the old pan was removed things looked fine inside. Now to remove the old sump pickup and install a sump that will work with our new 2001 pan. The new sump has a tab for mounting to keep the vibes from breaking it and such. I could have taken the baffle off and run a bolt setup but I rather not put extra nuts and bolts that could stray. I opted to give a small spot weld as I had the welder out for the dip tube.
when all is set and done use good sealant, but make sure not to use too much. the pan bolts are tighten in inch pounds (74?in/lbs?) don't over tighen, I snugged them down every other one working around the whole pan.

Monday, March 21, 2011

1993 Miata engine swap and mods continued

Got the 93' Miata into the shop last week and began the second stage of my friend's Miata drift/street racer/town car project. There are many pictures, not all will be posted but if someone needs a detailed photo give me a shout out. As was said in the blog earlier we'll be using a 1.8 protege engine in a 1993 1.6 Miata. Several modifications will need to be carried out. The biggest mod will be cooling - behind that, the oil pan.
First chore was to pull the fan units out then remove the air box/ air meter unit. this allows good access to the exhaust header which will need to be removed as well. I'll be leaving the intake on until the engine is out.
Once the both fans are removed you can pull the radiator. This gives a lot more room for removing the engine. I took the sway bar off just to add extra room; it'll be replaced with a Racing Beat sway bar anyways.

Lots of room to move, needed for the oil pan to clear. Also, you can see that the power steering and A/C have been removed. With a little contortion work the A/C rotates down and out of the way. From this point it was remove the header and exhaust, then shoot as many pictrures of where things were before.
At this point its back under to remove the drive shaft, trans to differential support (one of the prettier miata parts not seen often) and all the lower trans bolts to the engine.
The shifter needs to come out of the transmission, real simple chore to do. A philips screwdriver for the console and a 10mm wrech have it out in a jiffy. Don't be surprised to find the boot that seals the shifter in the chassis torn. You can see the old boot on the passengers floor with the three bolts that hold it in.
From this point a few more wires, connectors and the clutch slave need to be removed. Then when all is clear its time to hook up the cherry picker! Yay. This was my first time (that I remember...) using one of these to pull an engine out with the trans still connected. Good advice was given to remove all the lower trans bolts. I did however space on draining the trans first. If you do give this sort of thing a go either drain the trans or plug the back end. I was going to drain it but too excited to keep moving on this project
Not sure why but I had to pull the driver's side engine mount to help the engine clear and give some wiggle room.
All the rest of these pictures are of the final pull. It went pretty good, though I have some concerns as to dropping it down into the chassis and hooking up the trans/diff support brace. but now its out we can do our mods!

BMW Hot Rod

Spring is almost here. With the warm weather dropping in it was time to wake up the hot rod BMW.  So Saturday found me dropping the batteries in and giving it a splash of fuel.  Off it fired, time to get riding soon.

1979 Honda Civic

Here's an old photo of my 1979?  Honda Civic or so I think.  Pretty sure it was a 79'. The picture is just after finishing a rattle can paint job.  The spoiler is from a buddy's old Ford van.  I thought it fit it well; didn't do much for high speed handling being a front driver. Ah youth....  probably should have put the 440 in this. This picture was taken about 1987 or 88'. If you look closely you can see the homemade air dam on the front.

Monday, March 14, 2011

1993 Miata engine swap modifications

Here is a picture of my friend's 1993 Mazda Miata 1.6, he picked it up this past fall to be the recipient of a much worked over 1.8 Protege LX engine. The idea seem simple enough at first but now, well... we'll see if this is more than your average in and out job.
The donor car is a 1992 MX3 with a worked over Protege LX engine.  Bored 2mm over at 85mm X 85mm;  the stock pistons have been changed out to Wiseco 11:1 slugs.  I also believe  that its been decked and milled to bring the compression up to 12:1. Guess that might rule a turbo out of the question. But its been said that its probably around 180Hp -  which maybe it won't need any induction help...nah.
Today's job was to rip the lump out and then get into removing the standalone engine management.  Its running a Megasquirt -II ECU.


The rip was basic and straight forward, pull the exhaust, remove all electrical connections, take out the drive shafts and then proceed to the engine mounts.  rather than drop the engine on the floor or use a cherry picker I dropped it on a roller cart.  At that point the cart was rolled under the list arm and the engine was chained to it;  using the list as the picker.
Mounting the engine was, well not what I was expecting but it all worked out.  Was able to use the transmission/engine mount bolts onto the engine stand and the other two bolts are from the power steering mount. Did trim the round tubes on the engine stand, but I can always re-weld those back on.

It looks so barren from underneath.


tomorrow will be the Megasquirt's turn to be removed.